User Guide
Introduction
This guide will provide an overview of RefinePDF and its functions. RefinePDF was created to increase the efficiency of organizing large PDF, TIFF and XPS files and is specifically designed to make these processes as fast and as easy as possible.
In addition to organizing documents RefinePDF grew to include many advanced document editing and optical character recognition functions to give users the ability to edit and extract targeted data. One of the most popular functions is to scan large documents using optical character recognition for search terms and extract pages to a new document, highlight found terms or mark pages that contain the terms for deletion.
The menu on the right can be used to jump to different topics which outline RefinePDF's functionality. Many topics contain videos and images which demonstrate the selected function.
Basics
Marking Pages
RefinePDF uses marked pages to identify which pages need to be removed, moved or passed into another function. Pages can be marked in multiple ways as noted below:
- The up and down arrow keys on the keyboard allows users to quickly move through a document and see a full screen view of the pages. Pressing the escape key will mark a page and advance to the next page; marked pages are flagged with a red X and unmarked pages have a green checkmark. To unmark a page with the keyboard hold down the control key and move to another page with the up or down arrow.
- To mark a page with the mouse right click on a thumbnail image or page number. To unmark a page with the mouse double click on the thumbnail image or page number.
- If you know a range of pages you want to mark go to Edit > Mark Page Range under the main menu and enter the range of pages.
Click this video file link to see an eight second demonstration of how pages can be quickly marked with the keyboard while viewing the pages of a document.
Save Document
Saving a document after marking pages will remove the marked pages from the document. If you want to save or print only the marked pages you can select the Marked option under the Save/Print options. Numerous other save options can be viewed under the PDF Functions & Options section of this page.
Document Editing
Add / Edit PDF Page Objects
PDF page objects can be added to a document or existing objects can be edited. To add or edit objects click the Add / Edit PdfObjects checkbox on the right side of the main window or under the PDF Options menu item. Once page objects are enabled existing page objects will be highlighted and new objects can be drawn on the page by selecting the page object you want to add under the Page Object column; left click and drag the mouse on the page to draw the object. Left click on a new or existing page object to edit the object's properties. To delete an object right click on it and it will be flagged for deletion when the document is saved. Page objects can also be moved or resized with the mouse.
Click this video file link to see a brief demonstration of how to add, edit, move, resize and remove PDF page objects. The demonstration uses a blank PDF document and adds a PDF textbox control and an image, performs some quick edits and eventually deletes the image. The purpose of this brief video is to show how easily page objects can be added and edited.
Disable Image Edits is an option right under the Add / Edit PdfObjects checkbox that will prevent embedded images from being edited. This is helpful if you want to draw additional page objects on top of an existing image.
Encryption & Permissions
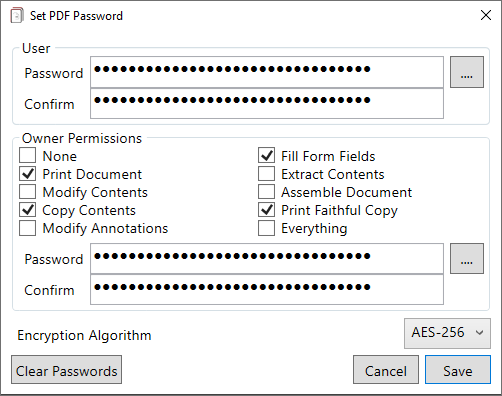
PDF documents can be encrypted with 256-bit or 128-bit AES encryption. The button to the right of the password textboxes opens a password generator which will generate strong and cryptographically random passwords. Encryption options are under the PDF Options > Encrypt / Set PDF Password menu item.
Merge & Split Files
Multiple PDF & TIFF documents can be merged into a single file or a document can be split into new files. The merge and split functions are located under the Tools menu item. The split function has options to split the document by the number of pages or output file size.
Move Pages
Pages can be moved to new locations within a document by using the Cut & Paste Marked Pages function under the Edit menu or by sorting the document with assigned page labels; sorting details are noted in a separate topic below.
Redact Text
Text can be removed from PDF and TIFF documents by using the Redact Text function. A black bar is placed over the existing text to hide it from the user. Click this screenshot link to see a document that has had text redacted.
The Redact Text function uses the same features used to search documents for text. This allows a user to specify specific words and phrases or use pattern matching to find and redact text. For example if all Social Security numbers within a document need to be redacted a pattern of $$$-$$-$$$$ could be used. Additional information about search options and pattern matching can be found in the OCR Search section below.
RefinePDF takes extra precautions to ensure targeted text within a document is truly redacted by removing PDF text data and text from within embedded images. Optical character recognition is used to find text within embedded images. If targeted text is found in an embedded image the original image is removed from the document and replaced with a new image with the text redacted.
Redacted text can be also be selectively excluded by hovering the mouse over the redacted text and right clicking to remove the redaction. This is useful if the redact search identifies text that you do not want redacted. The main window in RefinePDF will show a checkbox option of "Hide Redact Mask" after the redact function is run. Checking this box will remove the black bar hiding the text and will show all text that is to be redacted. This is a quick way to see what text is going to be redacted after saving the document and remove any redactions if needed.
Rotate Pages
Pages can be rotated using the Rotate All Pages or Rotate Selected Page functions under the Tools menu item. Ctrl + R on the keyboard is a shortcut to rotate the current page 90 degrees clockwise.
Sort Pages
Quickly organize large PDF, TIFF & XPS documents into chronological order by assigning page labels. It may seem burdensome to assign a label to every page, but this greatly speeds up the process of sorting large documents. On average it takes me one second to label a page. That extrapolates out to taking approximately 8 minutes to sort a 500 page document. Sorting documents of that size by hand usually consists of printing the document, spreading the pages across a large table and sorting them into small piles. This process can easily take more than an hour to do by hand and generates large amounts of wasted paper and time.
RefinePDF contains several functions to speed up the process of labeling pages. Many document types such as medical and legal records almost always contain multiple pages in a row with the same date of service. In these cases the same date needs to be assigned to pages that are grouped together. The plus key on the keyboard is used to assign the label on the current page to the next page and advance to the next page. The label is also highlighted so if changes need to be made a user can type the new label without having to use the mouse to highlight and change the text. Click the following link to view a brief video of the labeling process. After the pages are labeled the sort button is clicked to move the pages to their new location within the document.
Sorting Priority
Page labels have a sorting priority which groups them together to first sort by the group then the assigned label. The label sorting priority is as follows:
- Numbers greater than zero
- Dates
- Text
- No label
- Negative numbers
Sorting Categories
In addition to sorting pages by labels categories can be assigned which allow for additional sorting and page extraction options. Categories are assigned by using the star "*" character as a delimiter between the category and label. For example a page label of "Legal*1/1/21" assigns the category of "Legal" and label of "1/1/21" to the page.
Category Hotkeys
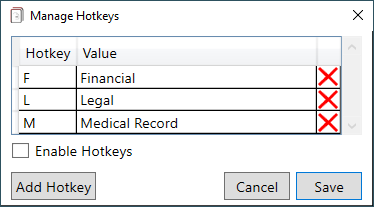
Categories can be assigned by typing them in the Page Label textbox, but if you need to assign categories to a large number of pages it is best to use category hotkeys. Hotkeys are assigned under the Edit > Category Hotkeys menu item. Once hotkeys are enabled pressing a hotkey one time will assign the category to the current page and advance to the next page. Assigning categories to pages can be done extremely quickly using the hotkey function.
Sorting Options
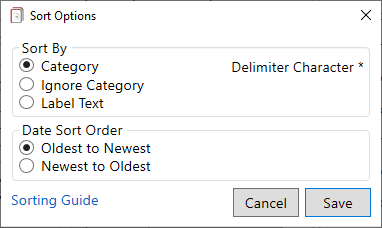
There are three options to sort a document based on the assigned page label:
- Category - First sorts the pages into the assigned category and then sorts within the category by the assigned label
- Ignore Category - Sorts using only the assigned label regardless of if a category is assigned
- Label Text - Sorts using only the page label text. Category and the page label sorting priority groups are ignored.
Export Pages by Category
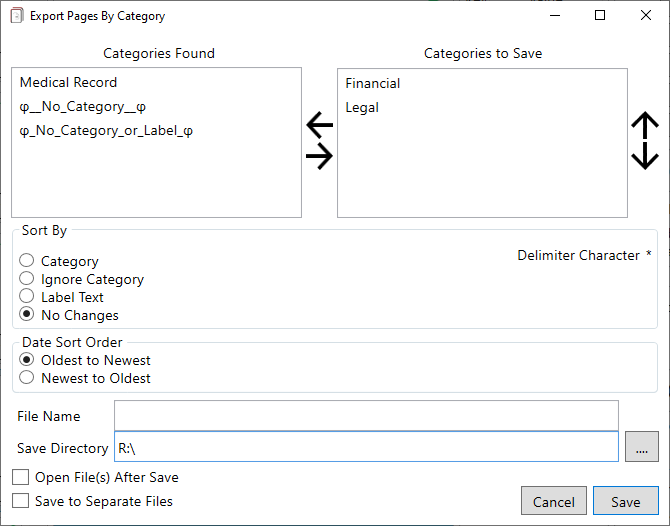
Pages can be exported to a new document by using the Tools > Export Pages by Category function. In the screenshot below only pages in the Financial and Legal categories will be copied to a new document. Both categories will be saved into one document and sorted by the selected Sort By option. The "No Changes" Sort By option will keep the current page order assigned to the open document.
To save the selected categories to separate documents check the "Save to Separate Files" checkbox; Financial.pdf and Legal.pdf will be generated if the Save to Separate File option is checked. This function currently supports PDF, TIFF and XPS file types.
Text Editing
RefinePDF uses text containers to add, copy, delete, edit, move and organize PDF text. Change fonts, font sizes, font colors, bold, italic & horizontal styles and text alignment. The text container toolbar shown below will be visible for all PDF documents if "Enable Text Functions" is checked in the Preferences window. Hover your mouse over the menu bar to get more information about each icon.
Enabling containers is done by clicking the first icon to the left in the PDF text editing toolbar above. To draw a container hold the left mouse button and drag. Holding the shift key with a left click and drag of the mouse is a shortcut for creating a container regardless of if containers are enabled first. Below is a screenshot of a text container that is used to edit existing text in one of my test documents.

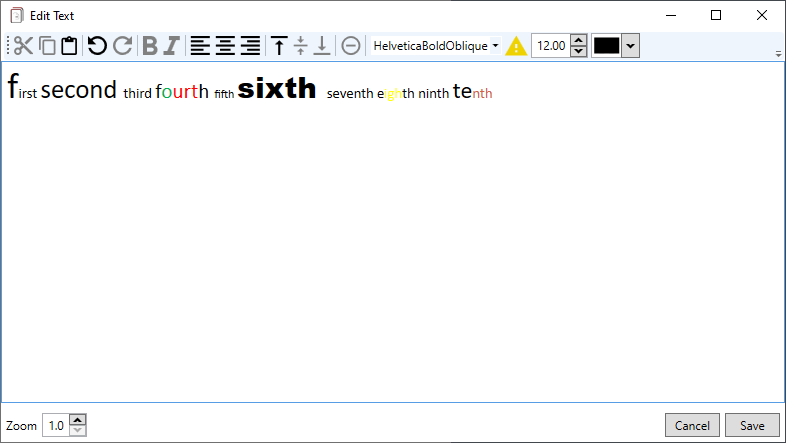
New or existing text is edited in the Edit Text window below. To quickly add new text to a PDF document hold the shift key and double click on a page. The quick draw option creates an empty text container at the location you clicked with no horizontal bounds and opens the Edit Text window. To edit existing text place a container over the text you wish to edit and click the Edit Text icon in the toolbar.
Optical Character Recognition (OCR)
RefinePDF supports optical character recognition to extract text from the following file types: BMP, GIF, JP2, JFIF, JPG, PDF, PNM, PNG, TIFF, WEBP & XPS. OCR from the Windows clipboard via system screenshots is also supported. The following functions are available under the Tools > OCR - Optical Character Recognition menu item.
Clipboard Image
Select text to OCR in an image copied to the clipboard. In Windows a screenshot can be copied to the clipboard by using the keyboard shortcuts Alt + Print Screen or Ctrl + Print Screen. Keyboard shortcut of Ctrl + I will open the Clipboard OCR function where you can select the area of the image you want to extract text from. Take a screen shot of anything shown on the screen and extract text from it regardless of the file format or application being used.
Duplicate Search
Use OCR to search for duplicate pages within a document. Matching is done by comparing the text of each page. Set the percentage match between the two pages to qualify as a duplicate. Below is a screenshot of this function which shows preview images of the duplicate pages that are found. The column with a header row of "Left", "Right" & "%" shows the page numbers for the left and right preview images and the percentage of text that is matched between the two pages. Pages can be marked by right clicking on a page preview with the mouse or using the buttons on the right side of the window. This function is available for PDF and TIFF documents.
Additional options for the duplicate function can be found in the Edit > Preferences menu item.
- Scan Type designates the type of scan to do. Currently "Fast" is the only option.
- Show Percent sets the percentage of text that must be matched for pages to be considered a duplicate. The screenshot below is set at 85% which means pages that contain 85% of the same text are flagged and shown for review.
- Scan Margins % will crop the scanned pages by the margin percent assigned. This is helpful if you want to ignore text that can be contained within the outer bounds of a page such as a fax header or footer.
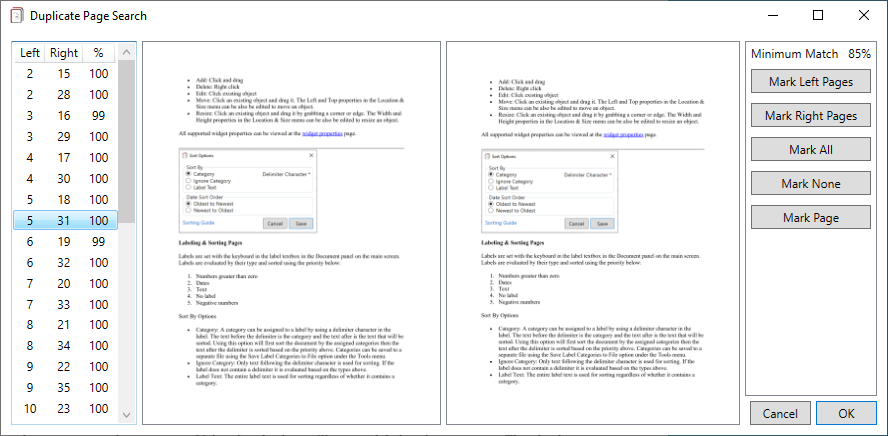
Image File
Opens an image file and extracts text that is selected with the mouse. The following image file formats are supported: BMP, GIF, JP2, JFIF, JPG, PNM, PNG, TIFF & WEBP.
OCR Pages
Extract text from within the open document. Specify the pages to scan by setting the current page, page range or all pages.
OCR Search
OCR Search finds search terms and phrases by scanning documents using optical character recognition. This is significantly faster than manually reviewing large documents and quickly identifies targeted pages.
OCR Search contains the following options:
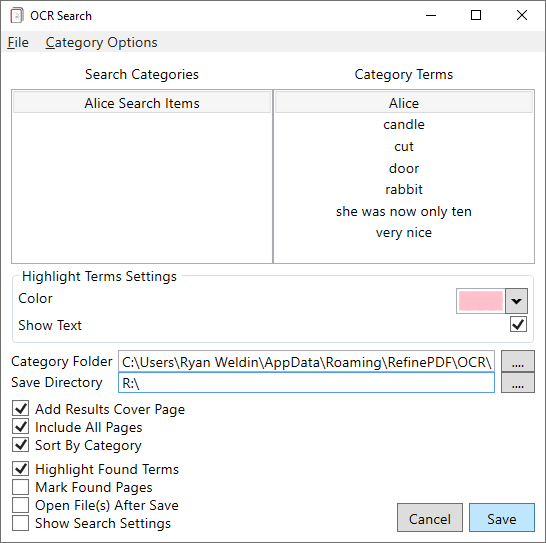
- Add Results Cover Page - Adds a cover page to a new document which lists all of the terms found and what pages they're located on. If the output file type is PDF the page numbers listed will contain clickable links to the page. Cover pages can also be customized with graphics and header text under the Show Search Settings options.
- Include All Pages - Includes all of the pages being scanned in the original document. If this option is not checked only pages that contain found terms will be included in the output document.
- Sort By Category - Groups the found pages in the output file by the specified category in the Category Options > Edit menu. This sorts the output pages by the category names.
- Highlight Found Terms - Highlights found terms with the colors set in the Category Options > Edit menu. Each term has its own color property to make more important terms more easily identifiable.
- Mark Found Pages - Does not generate a new document, but will mark all pages where terms are found.
Below are a couple of screenshots which show the OCR Search main window as well as the Category Options > Edit window. Using the options in the screenshots below the following PDF document was generated from the first three pages of the book Alice’s Adventures in Wonderland.
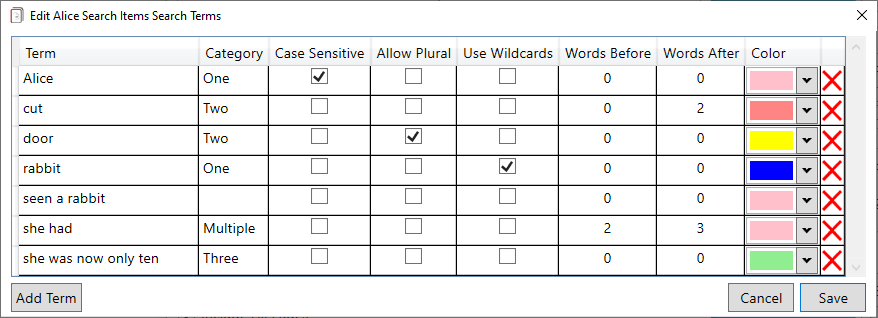
Additional options seen in the Edit window below customize search results as follows:
- Term is the search term or phrase to look for
- Category organizes the found terms into groups if the Add Results Cover Page is selected on the OCR Search screen
- Case Sensitive requires found terms to match the exact case specified in the Term column
- Allow Plural will the find the term and its plural form; the options from the screenshot below will look for door and doors
- Use Wildcards will search text using the wildcard range of characters in the position of the wildcard. Wildcard characters are not considered wildcards unless the Use Wildcards checkbox is checked.
- Dollar sign, $, is a wildcard character used to look for a numeric digit from zero through nine. A search term of $$$-$$$-$$$$ will match both 123-456-7890 and 999-999-9999 as all wildcard characters match a number.
- Percent, %, is a wildcard character used to look for any character in the designated position. A search term of %%%-%%%-%%%% will match both 123-456-7890 and abc-def-ghij as the % wildcard character will match any character.
- Backslack, \, is used to escape wildcard characters if you want your search term to include a literal $ or % character. A search term of \$123.$$ will match the text $123.45, but won't match 9123.45 because the first $ character is not a wildcard.
- Words Before will include the specified number of words before the search term in the search results
- Words After will include the specified number of words after the search term in the search results
- Color sets the highlight color if the Highlight Found Terms option is selected on the OCR Search screen
If you don't want to download the output PDF document referenced above you can click the following links to see screenshots of the cover page and a page that contains highlighted terms.
OCR Select
Use the mouse to select an area of the current page that you want to extract text from.
PDF Functions & Options
The functions & options described in this section can all be found under the PDF Options main menu item. Setting these options will not modify the original document until it is saved unless otherwise noted below.
Add Action to Highlighted Text
Actions can be quickly added to text by highlighting the text and using this function. If you want to add a hyperlink to an external source or link a page within the document this is a quick way to do it. Keyboard shortcut: Ctrl + D
Add Pages
Add the specified number of blank pages to the open document. Pages can be inserted anywhere within the document and the page rotation and size can be set. This function does require the open document to be saved before the pages can be added.
Add Watermark
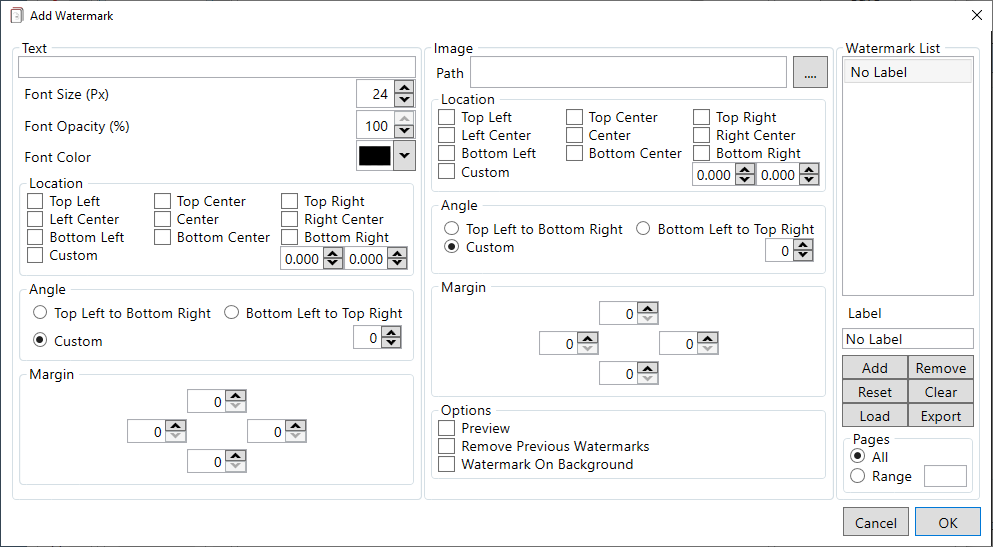
Text or image watermarks are added to each page or a range of pages in the open PDF. Multiple watermarks can be applied by adding items to the Watermark List.
Compression
Document compression to reduce file sizes is enabled by default with the compressions options selected in the screenshot below.

Extract Images & Text
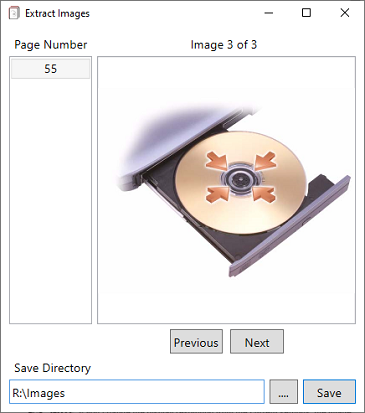
Extract images or text from the selected pages. Pages can be selected by choosing the current page, a page range or all pages. There are separate menu items for images and text under the PDF Options menu.
Flatten Controls
Locks all controls from editing
Linearize
Organize the PDF in a special way to enable efficient incremental access in a network environment. This allows document pages to be streamed when read from a network.
New PDF Document
Create a new PDF document with initial options to set the number of pages, rotation and page size.
Page To Image
Saves the selected pages to the selected image type. Pages can be selected by choosing the current page, a page range or all pages. Pages are output in either the PNG, JPG or TIFF image format.
Remove Objects & Properties
RefinePDF can remove existing PDF objects and properties. All of these removal options can be selected under the PDF Options main menu item. No changes are made to the document until it is saved.
- Remove All Bookmarks - Bookmark structure is removed from the document
- Remove All Widgets - This includes PDF controls like a textbox, checkbox, radio button, signature fields, etc. as well as other widgets like annotations and action areas
- Remove PDF Password & Permissions - Password and document permissions including encryption are removed
- Remove Signature Permissions - Signature permissions are removed if the document contains them
- Remove Watermarks & XObjects - Watermark images and text are removed from the document
Set Metadata
Set document metadata fields such as author, keywords, subject, title, etc.
Shared Scripts
PDF documents can contain embedded JavaScript for high level customizations. This function allows you to add, edit or view embedded scripts.
Stamp Pages
Places the assigned page label on the page in the set location.

